If you have overheating problems with your PC, then you might find some useful hints or ideas on this page.
I had some problem with my PC, mainly that it would slow down almost to a halt in many 3d games,
and would also give inconsistent results with benchmarking programs. In the end it turned out to
be due to overheating of both the processor as well as the graphics card.
I could get it to work to some extent by leaving the case open and directing a desk fan at the
inside, however that is hardly a practical solution.
The only cooling that the PC had was the PSU fan extracting air, as is standard practice with
the ATX form factor. I had also added an 80mm fan at the front of the case, pushing air into
the case. However this proved insufficient. Problems usually started when room temperature was
above 30 Celsius and processor load was high.
I decided to sort it out. The solution worked fine but is is probably a bit of an overkill since
the processor is just a Celeron 1700 (over clocked to 1900) and the graphics card a geForce MX440,
which are far from being the most power hungry equipment around. Nevertheless due to very high
room temperatures being common (sometimes even 40 Celsius - no air conditioning), having too much
cooling can never be a bad thing.
I replaced the standard Intel fan-heatsink with a Zalman 7000 all copper cooler. The two pictures
on the side here show the two coolers side by side. The Zalman cooler has a much larger cooling
surface area, an all copper construction and a large 90mm fan (which is also very silent)
This made quite a difference in the CPU operating temperature. At a room temperature of 32
Celsius with case open and the desk fan directed into the PC, I was getting CPU temperatures of 62
Celsius at full load. With the Zalman cooler this came down to around 51 Celsius
under the same conditions.
The Zalman cooler is a beautifully engineered product, and quite possibly the best CPU cooler available,
except for water cooling and other 'exotic' cooling methods. It is also a great accessory for anyone who
has a transparent side cover, in which case it is worth installing even just for its looks!
However when I closed the case, the temperature soared to 65 Celsius, despite the huge
heat sink.
With the original heat sink it would reach 69 under the same conditions, but probably the only reason
it doesn't go higher is that CPU's automatic 'thermal throttling' goes into action, which almost halves
the power consumed by the processor (and of course the processing speed as well).
The solution was quite obvious - stick a lot of fans in the PC (preferably in some sensible manner). The problem
was that the case had very little spaces where to put fans. The only provisions were space for two 80mm
fans at the rear and one at the bottom front of the case. I therefore hacked two holes in the side panel
to fit 120mm fans.
Into these I put two Enermax fans which are reasonably silent and can push a very respectable
90 cubic feet per minute of air each (at zero static pressure). They are also a nice decoration for the case,
as they have transparent fan blades and a very nice looking gold coloured grille. (Pity I did such a poor job
cutting the holes in the case!)
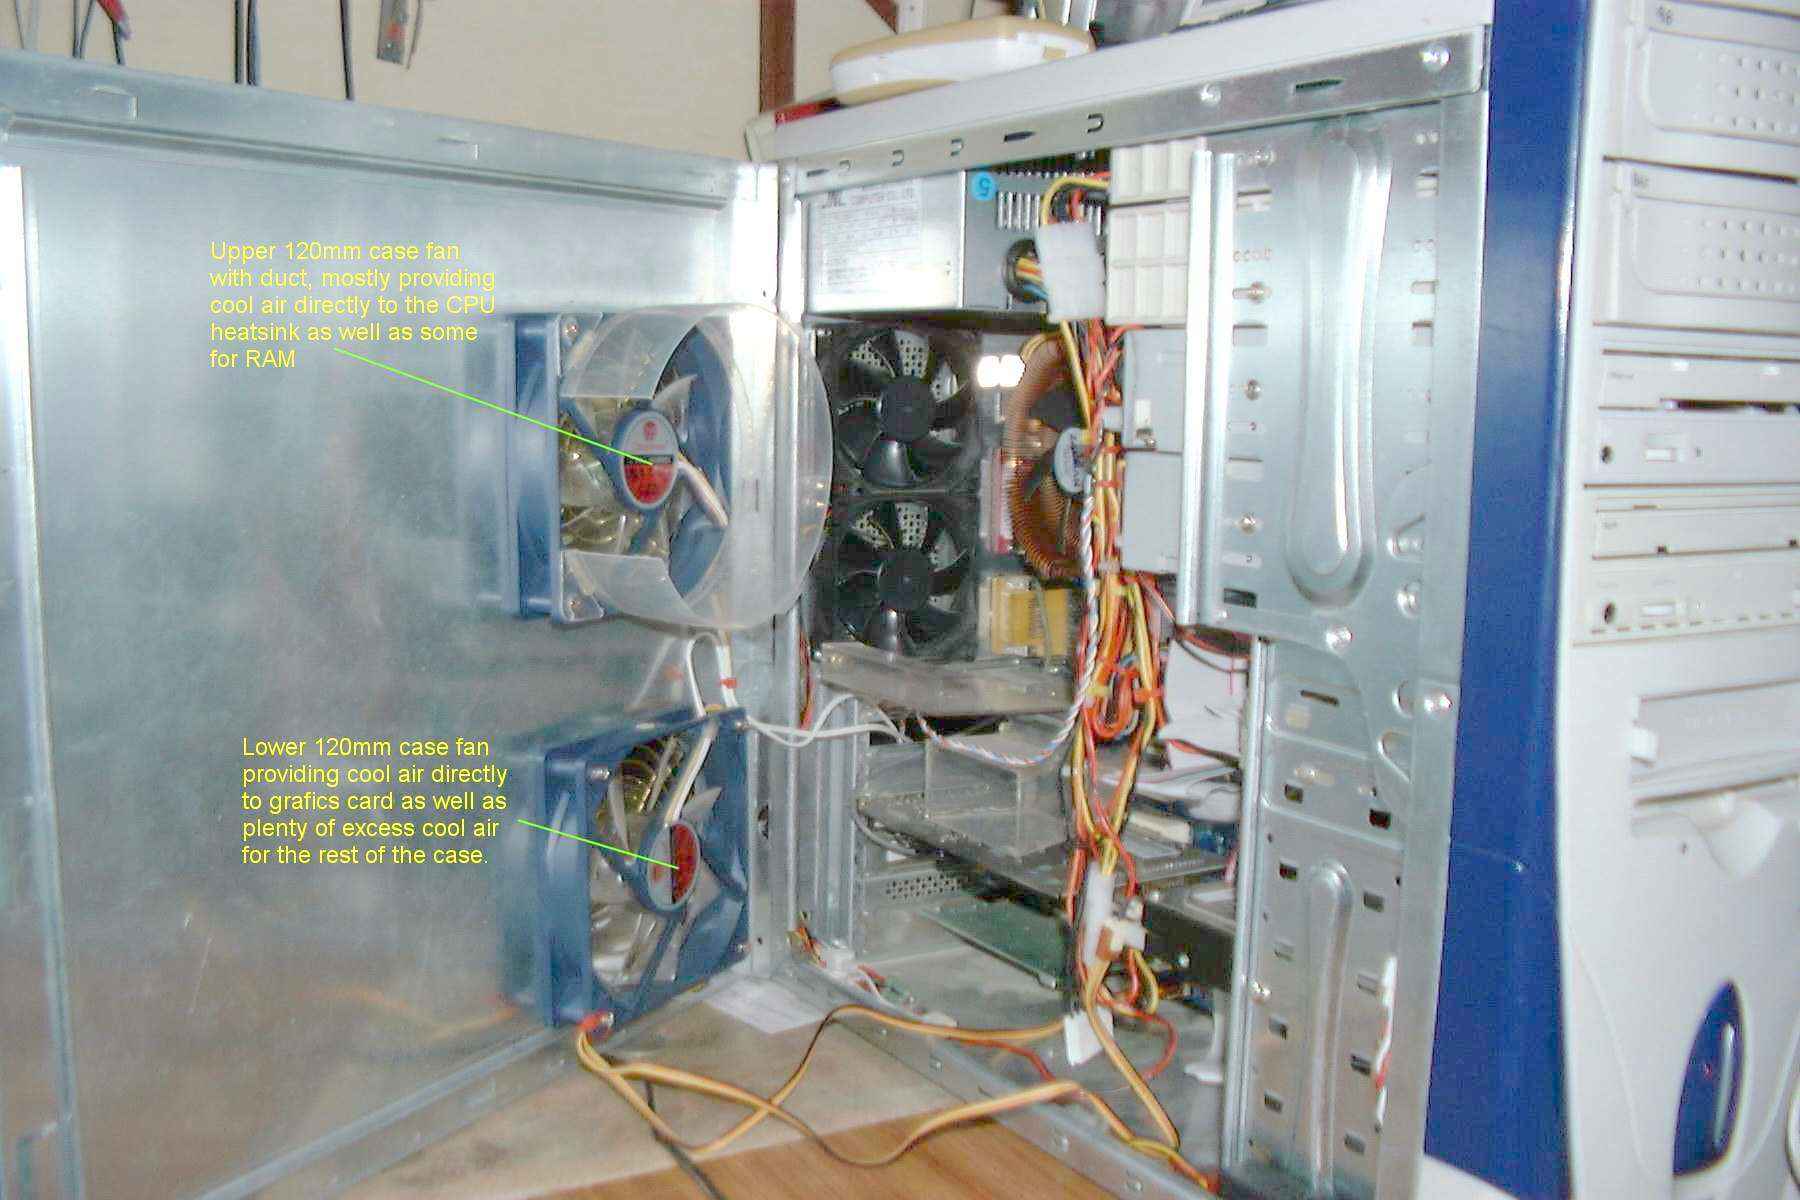
The upper fan is located directly in front of the CPU and centered on it. To ensure that as much fresh air as
possible is available to the CPU I attached a plastic duct to it to direct the air straight at the CPU heat sink.
It also prevents the two rear extract fans from 'stealing' the fresh air before it has a chance to do its work.
I cut a slot about 50mm on one side of the duct to put some amount of air on the RAM banks as they get quite hot
as well. This reduces slightly the amount of fresh air to the CPU, but in practice I didn't notice any measureable
increase in CPU temperature after cutting the slot.
The lower fan is the second source of fresh air into the CPU case, but I also use it to force some air into the
graphics card heat sink. The graphics card has a fan-heatsink which is much too small for the job.
Unfortunately it is stuck with glue to the GPU chip and removing it would most likely break something. Since I
could not replace it with a better heat sink, I constructed a funnel and attached it to the
heat sink fan. The funnel
is positioned such that the lower case fan is directly in front of it and almost touching it. The case fan therefore
forces air into it with considerable force, so much so that it even forces the tiny
heat sink fan on the GPU to spin
faster (you can actually hear the increase in pitch)
I also had quite a problem with the CD writer becoming extremely hot, and wanted to solve this problem
as well. It has very little ventilation, so much so that even if kept outside the PC on a long cable
it would still become extremely hot. In other words cooling the outside of it helps, but not enough. What was
needed was to force air through what little openings it has in its case. The only way of doing this that
I could find was to force so much air into the PC case tht an appreciable amount would find its way into the CDRW
case and take away some heat with it. The solution was to have more CFMs of air pushed into the case than the extract
fans can remove. This results in some air pressure building up in the case and thus forcing the air to find its
way out from any possible opening in the case.
The total airflow provided by the two enermax fans is about 185 CFM,
while the total combined airflow of the three extract fans and the CPU fans amounts to about 130 CFM, leaving a
potential excess of 55CFM. Of course that flow would only be obtained if there was no obstruction to the airflow
out ofg the case, however in the end I found that it does indeed result in a considerable airflow through the CD
writer, and it made a huge effect in keeping it cool. Before the modification, when I burned a CD at 32x, it
would come out of the writer so hot that it would have a burnt plastic smell and was actually too
hot to touch. Now it just comes out of the drive 'very warm' and I'm sure the CD writer is happier as well.
A side effect of this was that the other CD writer (which I use only as a CD-ROM) and the secondary
removable hard disk are also kept cool.
The last fan I have not mentioned is the one in the bottom front of the case. Its main purpose is to make sure that
a sufficient amount of air brought in by the two large fans passes around the main hard disk to keep it cool. The operating
temperature of the hard disk has been reduced from about 56 Celsius to about 41 (at 35 C room temperature). I had meant to
construct some plastic ducting to encourage airflow close to the surfaces of the hard disk, but the results were already
better than good enough. The extract fan also helps reduce to some extent the case pressure. Although some case pressure is
needed to force air through the CD writer, too much of it would mean a considerable reduction in the airflow that the two large
fans can maintain.
Most often I run all the fans at minimum speed, except the CPU fan. When the room temperature is higher than about 35
Celsius, or the PC is doing hard work I switch the two 120mm fans to maximum speed. I also do this when CD burning to
ensure the maximum possible air flow through the CD writers.
When adding ventilation to a PC (or anything in fact) it is important to have some sort of coherent strategy on how the air
should flow through the system. You want to make sure that you don't end up with fans working against each other, or having extract
fans suck out fresh air before it has had the opportunity to cool anything yet. You also want to avoid having 'dead spots' where
there is no air flowing. If you're not careful, you could easily have part of the PC overheating while other parts of it are in a
hurricane.
In this case, the overall strategy is to get fresh air in through the side panel and exhaust
the warm air from the front and back panels of the PC. The front exits include the CD writers, the
removable hard disk and the extract fan in front of the main hard disk. The back
exits include the standard PSU fan, the two extract fans (which remove most of the hot air generated by the CPU) and the
PCI slots. The unused PCI slots have perforated covers to allow airflow through them.
With cooling fans, the general rule is 'bigger is better'. All else being equal, a large diameter fan will create much more airflow
than a small one and will usually also be much quieter. For example, the 120mm Enermax fans I installed each
create almost as much airflow as three of the 80mm fans combined, yet makes only half the noise of one 80mm fan.
A note on fitting the Zalman CPU cooler:
When placing the heat sink on the CPU and tightening, it will first appear to be loose no matter how much you tighten the screws.
This is not because it is actually loose, but because the conductive paste lubricates
the interface between the CPU and the heat sink.
The reason for this is that the layer of paste will invariably be too thick initially. The solution is to slide the
heat sink around
(it will move a few millimeters each way) while also slightly rotating it and keeping a downward pressure on it. In this way, excess
paste will be slowly squeezed out and the heat sink will slowly start to feel tighter. It will eventually become rock solid,
almost as if you had glued it onto the CPU. The heat sink paste will at this time be very thin, and mostly occupying the minute
scratches and imperfections between the two surfaces.
Remember that although the paste is meant to be conductive, even the very best paste is in reality a very poor conductor when
compared to metals. The purpose of the paste is to fill in minute air gaps between the two metal surfaces, not to keep the metal
surfaces separate. If however there is too much paste, it will actually be worse than having no paste at all. If the CPU and heat
sink both had absolutely perfect and flat finish, then paste would not actually be needed at all, however achieving such surfaces
would in itself probably cost far more than the CPU itself.
Sometime in January 2004, I upgraded the CPU to a 2.66 P4, for which I had to upgrade the motherboard as well. I succesfully
overclocked it to 3.3GHz without any overhheating problems - CPU reaching max of 48C with a room temperature of 22C at full
processor load with a little loading program of my own. (I used a simple VB program with a loop and some aritmetic - I found this
to stress processors more than any of the other stress test programs) With any other program I tried, (CpuZ, Sisandra, PcMark
and other) the highest temperature reached was 45 to 46 C. I do however have another problem (MB related) which prevents me
from overclocking.
Unfortunately the motherboard (or perhaps the CPU itself - who knows) seems to have some intrinsic problem with overclocking,
as even at 1% overclock the system is never stable
for more than a couple of hours. Strangely enough, whether I overclock just 1% (up to 2.7G from 2.66) or 25% it doesn't seem to make
much difference on stability (though the temperature difference is quite distinct). However, going from 1% overclock to standard speed
makes all the difference, and in fact the PC often runs for a week or more (24hrs a day) doing hard work (mostly seti) and has only
once done a lockup. If I again try to overclock even by the smallest amount it doesn't survive for more than a few hours. The
motherboard is an ASUS P4S8X-X. I've also had problems getting it to work first time, but it was just a matter of upgrading the BIOS. Apparently
that seems to be a well known problem. However I have never come across the overclock problem before.

 I replaced the standard Intel fan-heatsink with a Zalman 7000 all copper cooler. The two pictures
on the side here show the two coolers side by side. The Zalman cooler has a much larger cooling
surface area, an all copper construction and a large 90mm fan (which is also very silent)
I replaced the standard Intel fan-heatsink with a Zalman 7000 all copper cooler. The two pictures
on the side here show the two coolers side by side. The Zalman cooler has a much larger cooling
surface area, an all copper construction and a large 90mm fan (which is also very silent)